How to mount encrypted VeraCrypt or other volumes on an Android device - H2S Media
How to mount encrypted VeraCrypt or other volumes on an Android device - H2S Media |
| How to mount encrypted VeraCrypt or other volumes on an Android device - H2S Media Posted: 18 Feb 2020 12:44 AM PST - Advertisement - If you want to encrypt everything on your computer there are a number of encrypting solutions are available out there. One of the most popular and strong encryption solutions among those that are available is VeraCrypt which is an open-source encryption solution that runs on most systems. However, as VeraCrypt is an open-source solution to encrypt all your sensitive files, a question might come in your mind, how to mount VeraCrypt volumes on your Android device. From time to time, you need to carry certain files from one place to the other, and if you need to work with the encrypted files on the go, mounting them on your Android device is the only solution. Even after being an open-source solution, VeraCrypt doesn't officially support Android devices, but there is a workaround that can enable the option to mount VeraCrypt volumes on your Android device. Today, I will discuss, how to do that here. You can also see, how you can set up a VeraCrypt volume on your computer and store all your sensitive files there. I have mainly discussed, how you can create a virtual VeraCrypt volume to store all your sensitive files within it, and that seems to be a versatile solution rather than encrypting a complete physical volume. So, without any further delay, let's get started with how you can Mount VeraCrypt volumes on your Android device and limitations that you might face. Mounting VeraCrypt on AndroidOn your Android device open the Google Play Store and download EDS Lite, or you can even purchase the EDS app for your Android device, which will cost you around INR 480 or around $6-$7. Here, I am using the EDS Lite app, as that will be useful for almost all the tasks. 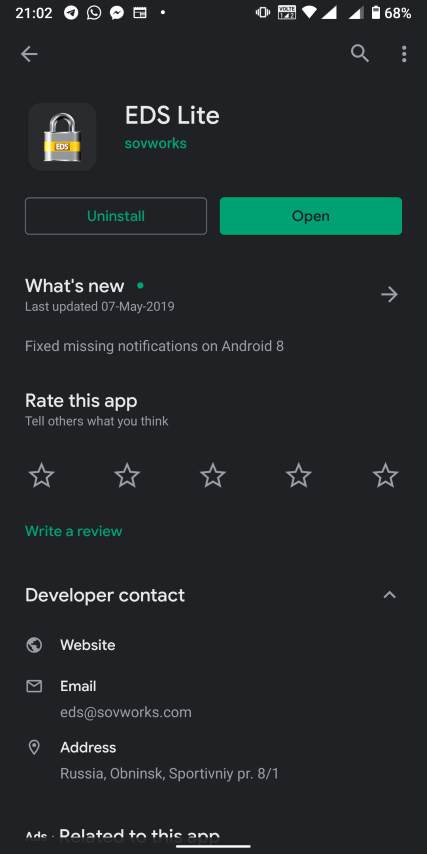 The question might come to your mind about the limitations of the lite edition. Well, EDS Lite is the free and open-source addition of EDS, and it comes with significant limitations, however, if you just want to Mount VeraCrypt volumes read and write to those volumes on your Android device, you will not face any issues. Another point is that both the apps are developed by the same developer, i.e. sovworks. You can also download the source code of EDS Lite from Github, and can modify it as per your requirements, obviously if you know what you are doing and you have coding skills. 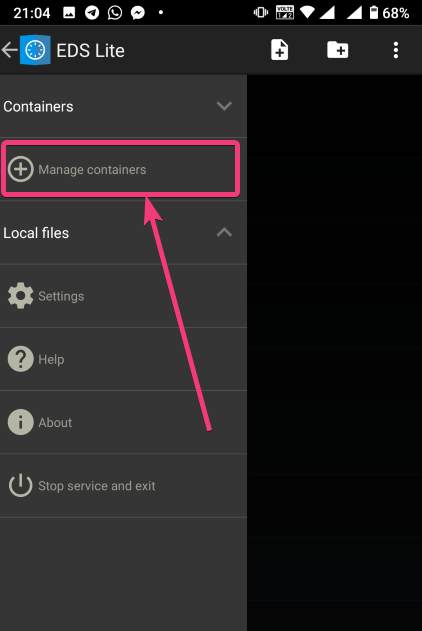 Now, tap on the '+' button.  Mounting an existing volumeNow, you will get two options. You can either create a new container or can even mount an existing container. Here container refers to a volume. First, I will talk about, how you can mount an existing container, aka. Volume. To do that, tap on the 'Add existing container' button.  Now, in the menu that appears, change the 'Container format' to 'VeraCrypt', by tapping on the 'Change' button. 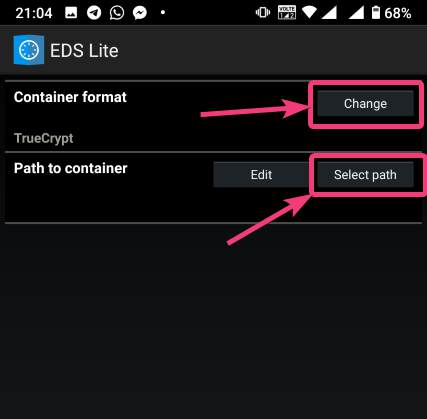 Now, you will have to select the path, where the VeraCrypt volume is located. I am sure, you have copied the VeraCrypt volume to your Android in some way or the other. Just tap on the 'Select path' button, and locate select the VeraCrypt volume. Finally, tap on the small tick button. Now, just tap on the tick button once again to exit the process of adding a new volume. 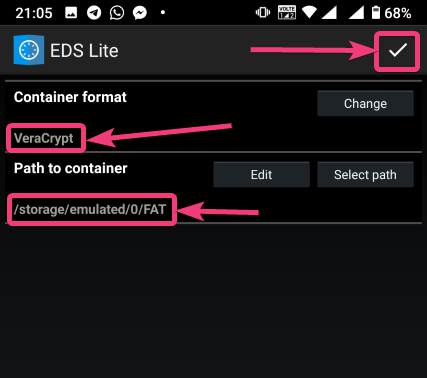 Now, the VeraCrypt volume will be displayed to you. Just keep tapping the back button, unless you come back to the home screen of the app. 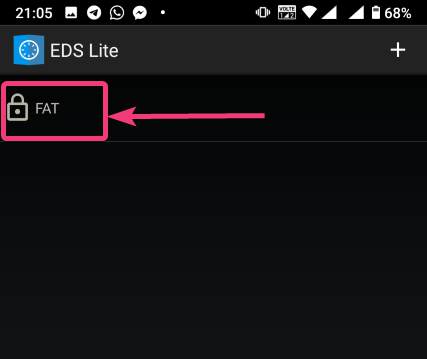 Now, tap on the hamburger icon again, and you will find the VeraCrypt volume added by you. Here FAT is the name of the volume. 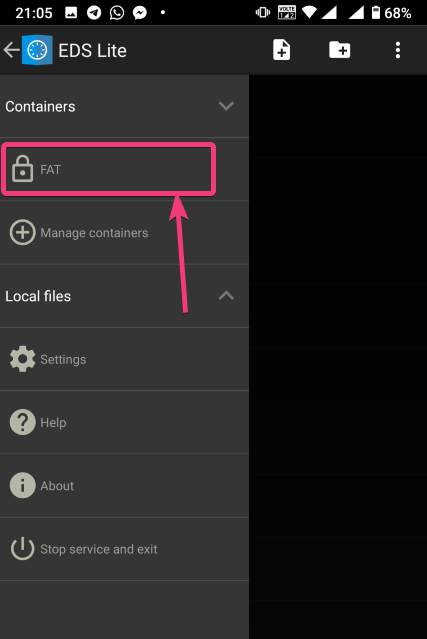 In the next step, enter the password for the volume, and tap on 'OK'. 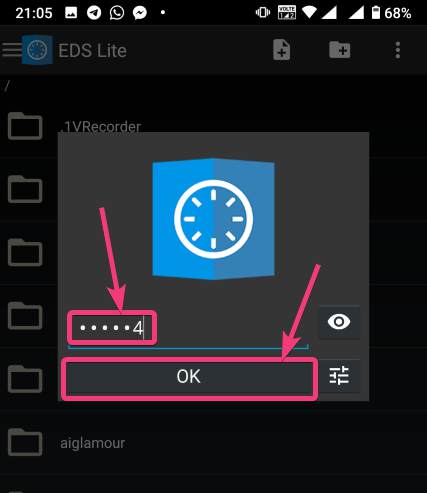 The contents of the VeraCrypt volume will be displayed to you now. 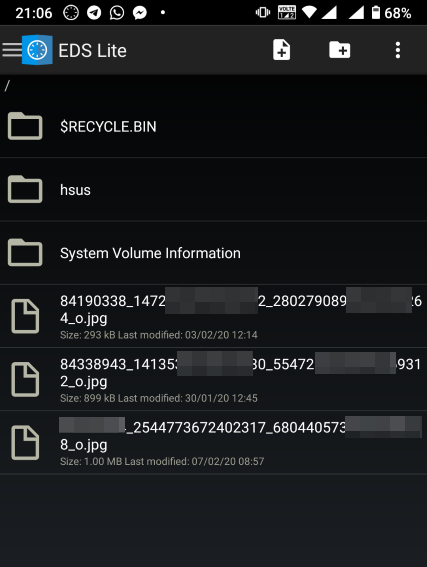 The volume will be there mounted unless you manually dismount the volume, or at least make EDS Lite ask the password next time you try opening the same. Just tap on the hamburger icon, and then tap on the small shield icon corresponding to the volume. 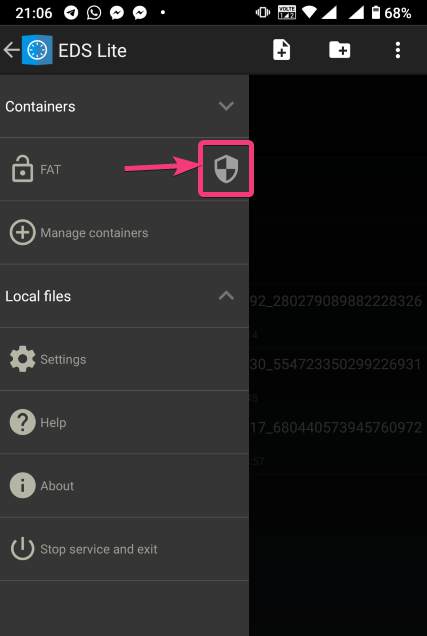 Now, you will have to enter the password for the volume, the next time you try to see the contents or modify anything within the volume. Creating a new volumeAmong the two options that you get, tap on 'Create new container' to get started creating a new container or volume. 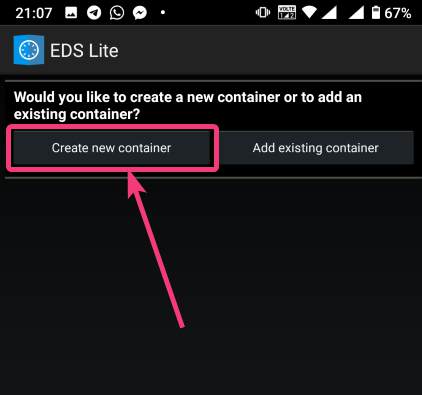 Now, change the 'Container format' to 'VeraCrypt', set a path of the container, by tapping on the 'Select path' button, 'Container password', by tapping on the 'Change' button, 'Container size', Encryption and Hashing algorithm, and so on. You should also enter the name of the file or the virtual volume that you are creating. Finally, tap on the tick mark. Here, vera is the name of the volume. 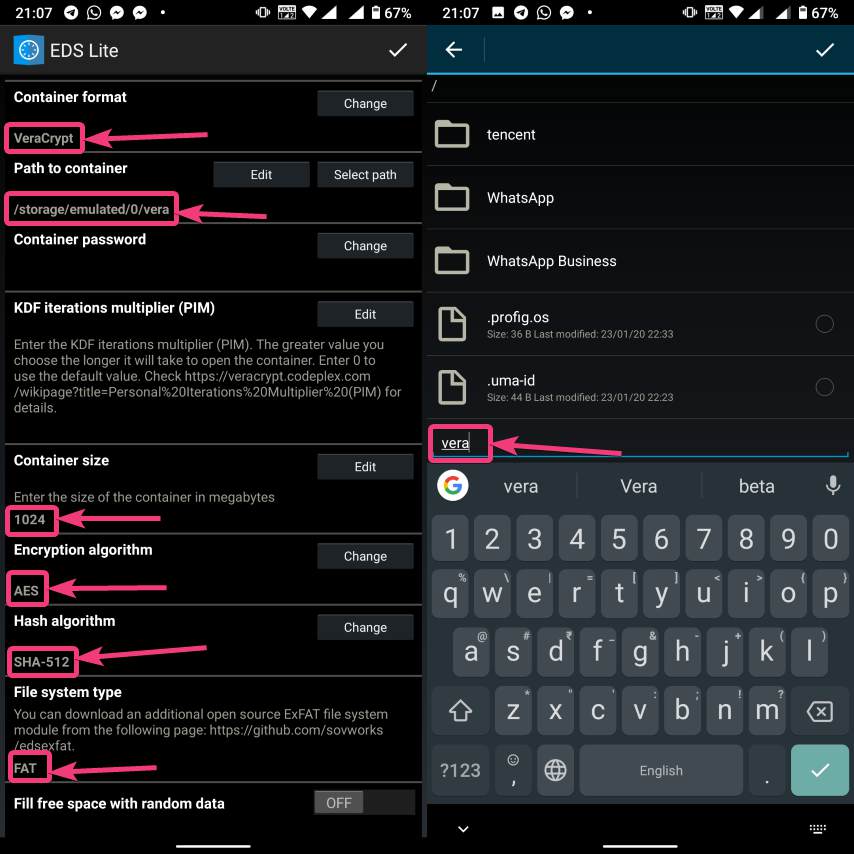 Now, tap on the hamburger icon again, and tap on the name of the new container created by you. 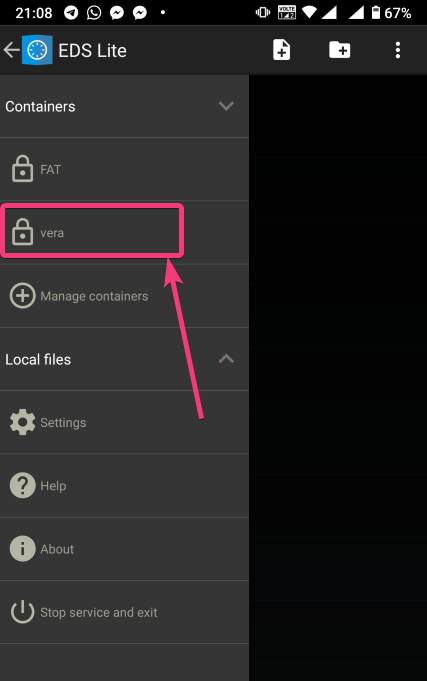 As usual, enter the password, like you did, at the time of mounting the drive, and you can add new files to the volume. Afterwards, you can mount the volume on VeraCrypt running on your computer in the usual way. After you have completed all your work with the VeraCrypt volume on EDS Lite, it is a safe idea to unmount all the volume. To do that, just pull down the notification dashboard and tap on 'Close all EDS Connections'. This will immediately close all the connections, and the volumes will be unmounted. 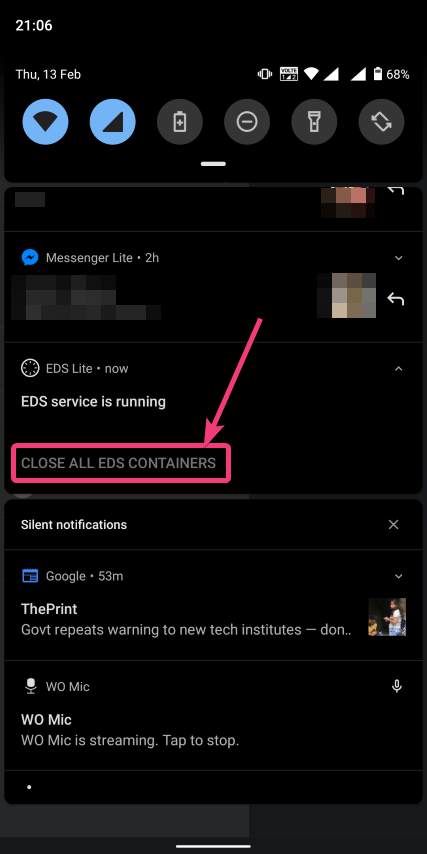 EDS Lite makes it possible to mount your VeraCrypt or other encrypted volumes right on your smartphone running Android. This can be useful in several situations, to say the least. Even though, there are certain limitations on the ways you can read and write files from encrypted volumes using the app you should still keep the app installed on your Android device to get the best out of your encrypted volumes. Among the major limitations that you can find in EDS Lite is, you cannot mount NTFS or volumes formatted in other formats using EDS Lite. So, you are pretty much limited to the fat file system when it comes to mounting encrypted volumes using EDS Lite. You can, however, mount exFAT volumes but that will require an additional plugin to be installed, which you can download here. Another limitation is that you cannot open the content of the containers for the volumes in your favourite File Manager to get a better experience of reading and writing files to the containers. Even though there is an option in settings that should enable the feature to open the contents of the volumes in a different file manager but I can't get it working for me. |
| How to securely wipe anything from your Android, iPhone or PC - Wired.co.uk Posted: 26 Jan 2020 12:00 AM PST  Getty Images It makes sense to reuse, recycle, give away or sell on fully functional phones and computers when you've upgraded to the next model. Unfortunately, unethical chancers can, have and will data-mine second-hand hardware. So, to help protect your privacy, here's the WIRED guide to securely wiping your data. Internal storage found in all phones and computers comes in two main flavours: magnetic hard disks write data to spinning platters and usually provide more capacity for your money; solid-state storage is faster and more physically robust as there are no moving parts. Solid-state is ubiquitous in smartphones and tablets and also widely used in desktop and laptop PCs. You'll also find both inside portable external hard disks. Deletion isn't erasureRegardless of what kind of disk your device has, it's important to remember that deletion isn't erasure. Even after you delete a file and empty your trash, all this does is mark the sector of drive it was on as available to be written. If you delete everything from a hard disk on a phone or PC, write over every sector with junk data, and then delete that, the original deleted data becomes virtually unrecoverable. Multiple cycles of this constitute secure deletion compliant with British and US government guidelines. How to securely wipe an Android phoneIf you haven't encrypted your Android device, a standard factory reset isn't enough to ensure that your old files can't be recovered, particularly if the phone is rooted. Rooting is a process that allows you to get root, or highest level, access to the Android operating system code and is similar to jailbreaking Apple devices. While that might come as a relief if you've accidentally wiped your phone without backing up your treasured meme collection, it's not particularly helpful from a security perspective. To start with, if you've not already done so, encrypt your phone. Most recent Android versions will have done this by default. Go to Security & Location, Advanced, Encryption & credentials to check. If encryption is enabled, then a factory reset will indeed render your data irretrievable. However, older Android devices, from 2015 and earlier, were susceptible to data-retrieval techniques even after a factory reset had been carried out. If you've got one of these, enable encryption, factory reset the phone, and then, for good measure, fill up its storage to ensure – as best you can – that every cell of its solid-state hard disk has been written before wiping it again. This isn't great for the disk, but security is our priority here. Some recovery tools, such as Disk Digger Pro, which costs £2.30, have disk wiping features that fill up space occupied by files now marked as deleted, and then erase them. How to securely wipe an iPhoneiOS is a bit more hardcore by default than Android, in that all your data is strongly encrypted by default, with keys handled by a dedicated hardware Secure Enclave Processor found in Apple's mobile devices. That also means that, when you Erase all content and settings when preparing to pass on your iOS device, your data will be rendered cryptographically inaccessible. How to securely wipe a hard diskThis is where things get a little more hardcore. The easiest way to securely erase a mechanical Windows or Linux system disk is to download a piece of software called Darik's Boot and Nuke (DBAN). Once this is done, burn the ISO file you just downloaded to a disc or USB stick (to separate it from your hard drive) using a tool such as Rufus or Balena Etcher. You then need to open the ISO and follow the instruction to start DBAN. Use the J and K keys on your keyboard to page through your available disks and F10 to begin the wiping process. If you want to securely erase a non-system disk (like an external hard drive or anything that does not contain an operating system), Piriform's CCleaner or Free and EaseUS's Partition Master Free both make this easy for Windows users. If you're running Linux then you can install the secure-remove or scrub tools from most popular Linux repositories. Users of macOS get the easiest option: you can simply use the erase feature of Apple's Disk Utility. Select Security Options in the Erase dialogue box and switch from the default Fastest setting, which doesn't securely erase files, to the third (three-pass) or fourth (seven-pass) security level. Where possible, it's always a good idea to unplug any disks that you don't want to accidentally wipe when carrying out these operations. How to securely erase an SSDWhile traditional hard disks simply overwrite existing data as a matter of course, SSDs can only be written to a limited number of times before they fail, which means that it's better for drive longevity and future reuse to avoid scribbling garbage all over the disk. SSDs support a feature called Secure Erase, which uses a voltage spike to wipe the disk's internal mapping table. The newer and thus slightly less standard Sanitize feature does the same to every single block on the disk. Most SSD makers supply software to do this, but the tools are only designed to work with that specific manufacturer's drives – a pain if you have several hard disks from different makers. Operating system support is also often limited to Windows for home users and Windows Server or Linux for data centres. Nonetheless, if you have an SSD made by Samsung, Kingston, Intel, Sandisk, Micron and many others, your most reliable and convenient path to SSD wiping is to use the manufacturer's own software. Note that these must either be installed on a different drive to that which you intend on erasing or booted from a USB disk that the tool will help you create. You may also find this feature supported in some motherboards' UEFI settings (basically a settings screen for a motherboard), meaning that you don't need to download any software at all. Generic SSD wiping tools are thin on the ground. The easiest option if you need one is to pay $11 for Parted Magic, burn it to a DVD or USB drive, boot it and use Enhanced Erase to wipe your SSD. However, if you're comfortable following somewhat detailed instructions, you can boot a live Linux distro that includes the hdparm tool – Ubuntu does – and follow the ATA Secure Erase guide to wipe your SSD from the command line. Feeling lost? It's simpler than it sounds but do proceed with care. How to securely destroy any storage mediumFinally, if you've used a device to house very sensitive data, then physical destruction is your best option, particularly if you can no longer boot it to use secure deletion tools on it in the first place. The same applies to disks that you can no longer boot, but which may still store sensitive data that could be recovered by other means. Professional services are available to literally shred hard disks and other devices, but most people can do an entirely comprehensive destruction job at home by putting holes through your storage device with a drill (wear goggles and a mask for this), hitting it repeatedly and cathartically with a hammer or, in the case of smaller items such as SD cards, cutting them into pieces. More great stories from WIRED🍅 Why do modern tomatoes taste so bad? 🚙 How Tesla became the world's most overvalued car company 📽️ Marvel at the incredible real-life Iron Man 📢 How Slack ruined work 👉 Follow WIRED on Twitter, Instagram, Facebook and LinkedIn |
| You are subscribed to email updates from "android application encryption,what does it mean to encrypt your phone,how do you encrypt your phone" - Google News. To stop receiving these emails, you may unsubscribe now. | Email delivery powered by Google |
| Google, 1600 Amphitheatre Parkway, Mountain View, CA 94043, United States | |


Comments
Post a Comment